
The Definitive Guide to Getting your Product Pictures Taken – Part 12
High-quality product images – they are vital to having a listing page that converts highly.
Most people, including myself, have ZERO experience with photography in general yet alone taking product pictures. What that means is that we are going to have to find someone to take them for us.
This can be a huge pain in the butt because you have to:
- Know what types of pictures to take
- Have a product on hand that you can use in the pictures
- Find a decent photographer that knows how to take good product images
- Get it done as cheaply as possible while maintaining the quality
When I was looking for a way to get my product images done I went through all of the struggles mentioned above. I was able to get some very high quality images taken for a competitive price and they look awesome.
In today’s post, which is the 12th update in my Amazon FBA case study, I will be walking you through the best ways to get your product images taken at a low cost without sacrificing quality. I will also be touching on why having good product images is so important.
Why are GOOD product images important?
Most people shopping on Amazon make their buying decision off of the product image alone.
This is HUGE.
If we didn’t have a product image that displayed our product in the best way possible then we would be missing out on a lot of sales. Not only does that hurt our sales, but it also hurts our conversion rates.
We all know that one of the leading ranking factors in Amazon is the conversion rate of your listing. A product listing with a 5% conversion rate is going to rank higher than a product listing with a 2% conversion (assuming they are similar products within the same category).
High product listing conversion rates = Higher rankings in Amazon
Another thing to note is the click-through rate (CTR) from Amazon’s search results to your product listing.
A good, high quality image will produce a much higher CTR to your product which in turn will create more sales for you.
Just as an example, let’s look at the search results for “dog harness” in Amazon:

The VERY first thing you see for each product is their MAIN image.
Even if you were ranked 4th in Amazon for “dog harness” yet had a better image than the product ranking 2nd, there is a good chance you would get more clicks to your listing. And without clicks to your listing there are no sales to be had.
The bottom line here is simple:
A product with high quality images representing it will have a better CTR AND a better conversion rate. Both of these things are VITAL for being successful on Amazon.
I keep mentioning “high quality images” but what does that mean?
In the next section, I will break down what constitutes a high quality image from a low quality image. I will also explain the different types of images you should use for your listing to optimize your conversion rates.
What is a high quality image?
By Amazon’s standards, a high quality image consists of the following elements:

There are a couple of points that I want to touch on a specifically.
The first being the size of your image:
This is important, your image needs to be at least 1000px on the longest side and 500px on the shortest side to enable the zoom feature. The zoom feature lets customers hover over your image and get a better look at the product.
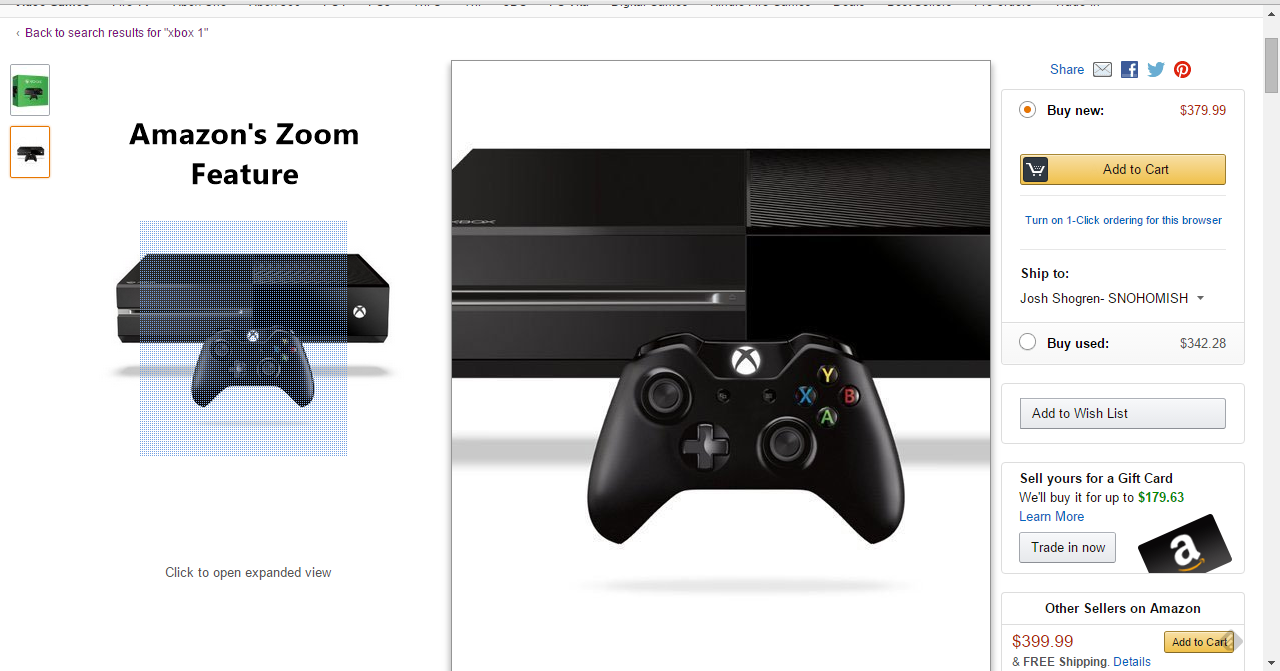
Amazon says it themselves; by having your images zoomable you will increase your conversion rates, which is exactly what we are trying to do.
Another point I want strain is having your product fill up at least 85% of your image space. This is important because it makes your product bigger (improves conversion) and Amazon requires you to have it. Amazon will take down your image if it doesn’t follow the 85% rule.
Aside from Amazon’s requirements, what else makes a good product image?
The number one thing, in my opinion, is the types of images that you take of your product. If you take 5 images that all look practically identical you aren’t helping yourself out much.
Next, I will be showing you the best types of images you can take of your product. I will also give some good and bad examples images.
The Best Types of Pictures to Take of your Product
There are two types of images you can upload, the MAIN image and the secondary images.
The Main Image
The main image is what you see in the results page when you search for an item:

As you could probably guess, this is by FAR the most important picture. That is why it is important to make this picture as good as possible.
The main image should be a clear image of your product and one that shows off your product the best way possible. I would suggest making the main image a picture of the product itself, nothing else. Good examples of a main image and one bad example are shown below:

See how the first two products have images of the ACTUAL product? This is what you want.
The people that are scanning the search results want to see the actual product and what it looks like.
The third image does a bad job with it’s main image because it a picture of the outside packaging of the product.
The outside of the packaging doesn’t tell the customer much about the product itself and it also looks low quality. I know for a fact I would click on the first two products before I clicked on the third, and I am sure most other people would too.
Secondary Images
The images are the ones you see when you click through to the product listing. You will see them underneath the main image to the left:

These images are used to support the main image and show different aspects of your product. You have up to 8 secondary images at your disposal and I would suggest using them all of possible.
Use these images as a way to show different angles of your product or different colors (if you have any).
One of the best uses of the secondary images is to show an action shot of your product. Meaning an image of your product being used as it is intended to be by the customer.
For example, with the dog harness above, it is smart to have an image with the dog harness actually on a dog. This goes a LONG way in making your product look more authentic and real.

People love to see the product actually being used and this will lead to a much higher conversion rate, which as you know will in turn help you rank higher in Amazon.
Another thing you can do with your secondary images is add something of value or to aid the buyer in the buying process. Using another example from the dog harness, you can see below that they have a sizing chart as a secondary image.

This is VERY smart as it eliminates one step of the buying process from the equation.
Let me explain:
If you were looking to buy a dog harness and didn’t know what size of harness to buy for your dog you would have to do some extra research. This would mean leaving Amazon and trying to find a chart to help you out.
The seller of this harness was smart and added the sizing chart right in the product listing. This keeps the customer on their product listing the whole time instead of them having to go to another page and find the chart.
Some other things you can do with your secondary images (and what I did) was take a picture of your product in it’s packaging. This way the customer will know exactly what the product will look like when it arrives.
Panasonic, which is the top seller for headphones on Amazon, does this same exact thing with their secondary images:

Another way I am utilizing my secondary pictures is is by having a close up of my brand name, which is on the product itself. My reasoning behind this is to show people that my product is different than the others because my brand is actually on the product.
I didn’t just go to China, buy a bunch of generic products and now I am trying to sell it on Amazon.
No:
My product is actually branded and has a legit company behind it. I think that this will go a long way when it comes to instilling confidence in the buyer to purchase my product over the competitors.
I do not have any proof or evidence that this works, but I am going to try it out and see what happens.
Secondary images are important and will help you sell your product once the customer has clicked through to your product listing. The above-mentioned uses of the secondary images will help you convert better and sell more items.
How and Where to get your Product Images Taken
You are probably wondering, “How in the world am I supposed to get high quality images when I have ZERO photography experience?”
Don’t worry, below I will break down a couple of different ways that you can accomplish this. I will try and provide as many different methods as possible. That way you can use the one that fits you and your product the best.
Elance/Odesk/Upwork
I am grouping all three of these freelancing websites together because they are all pretty much do the same thing. They are all a freelancing website where you can hire people to do things for you. In our case, we will be looking for photographers that can take high quality images of our product.
For this example, I will be using Elance.
First things first, head over to Elance.com and search for “product photographer”. You should see something similar as below:

Right off the bat the first three freelancers all look capable of taking our pictures for us. We can see that they all say they can do “product photography” which is a good sign.
I would check out each one of their profiles and look at their previous work. I would also make sure to message them before you hire them. This will allow you to explain to them exactly what you are looking for and how you want it done.
Just as an example, let’s take a look at the top freelancer that comes up when searching for “product photographer” in Elance.

This guy looks like the perfect candidate. He has previous experience with Amazon sellers and says he is familiar with their image requirements. Perfect!
Another thing to look at are his job history: We can see that his last couple of jobs have been Amazon images and they are both 5 stars. That is a great sign! Here is a link to his profile if you are interested – http://d_tyler.elance.com
If I was still looking for a photographer, he would be at the top of my list. Before I would hire him though, I would make sure to interview a couple of other candidates as well to see their pricing and how well they stack up to him.
You may be able to find a just as qualified photographer for a lot cheaper.
To hire someone you can either click on the green “Hire Me” button at the top right of the persons profile or you can post a new job. If you post a job you will have the option to invite specific freelancers to accept the job. This way you could invite a bunch of product photographers to your job listing and hire the one you see best fit.
Hiring a product photographer from a freelance website is a great way to get quality images taken of your product.
Craigslist
Finding a local photographer to take your product images is a little bit tougher because you will not have as good of a selection to choose from. However, you may get lucky and find a good product photographer in your area.
If you are in an area such as New York or Los Angeles you will have a much easier time finding one.
The benefit of hiring locally is that you can tell and show the photographer EXACTLY what you want and how you want your images taken.
To find a product photographer on Craigslist, just do a basic search for “product photographer”. If nothing comes up for that search term then you can try searching for “photographer” and see what comes up.
You should have a list of at least a couple different photographers. They will probably be wedding photographers or called something else but that doesn’t mean they can’t take good product images. What I would do is email/call everyone that pops up and see if they would be willing to take pictures of your product.
Not all photographers will be willing to take your product images, but I am sure someone will gladly do it. The Craigslist route may not be the best way, but it is at least an option to try out!
Friends and Family
There is a good chance that you know someone, either a friend or a family member, that is handy with a camera. If so, you can always ask them to take your product pictures for you!
This route will more than likely be a lot cheaper and you can tell them exactly how you want the images to look.
Even a decent photographer will be able to take the basic images for your product and this will save you some money.
ProductPhotography.com
These are the guys that took my product images and they turned out great. I initially heard of them from Freedom Fastlane and from there I checked them out.
Productphotography.com is a website where you send in your product with specific instructions on how you want the images taken and then they will do it for you.
You can have as many pictures taken as you want, but the more images you get the more it will cost.
It is a really straightforward process and it doesn’t take more than a couple weeks until you have your images ready to download from their website.
I was very happy with the final outcome and would recommend them to anyone looking for a good photographer. You can check them out here.
How to Get Action Images
I talked earlier in the post how having images that show your product “in use” is a great way to increase conversion rates.
Getting an action shot of your product while “in use” can be hard depending on what type of product you are selling.
If you were selling knives, you could easily get pictures taken while someone uses the knives and cuts some things with them.
On the other hand, if you were selling let’s say a bike cushion and you didn’t have a bike it would be kind of hard. You would have to borrow someone’s bike and have a photographer take pictures of the cushion on the bike you borrowed. Or you could find someone that is a photographer and ALSO has a bike, this way he could put the cushion on his own bike and take pics.
Either way, it will probably be fairly difficult.
The best advice I can give you (and what I am doing with my product) is to use a local photographer and borrow the item you need from a friend and use it in the photoshoot. That is really the best option you have if you are stuck in this predicament.
How I Got my Product Pictures Taken
Like I just mentioned above, I used Productphotography.com for some my of product images and then a local photographer for the rest of my images.
I used Productphotography.com for my main image and two secondary images. These three images are all NON-action shots and the images are of the product by itself (not being used).
My other images are action shots that were taken by a local photographer. I borrowed a friends “item” to use in the action shot and they turned out great.
So between the professional images that were taken and the action shots, I have 5 total images ready to go for my product.
All in all, this cost me around $160 for these images which isn’t bad at all!
Quick Update
Before this post comes to an end, I wanted to give you all a quick update on the progress of my shipment. I received an email from my freight forwarder two days ago saying that they are currently scheduling an appointment with Amazon to drop off the goods at their warehouse.
This means that my products are only a couple of days out from actually being live on Amazon! I can’t wait!
I am extremely excited for them to FINALLY be on Amazon after all of these months of putting everything in place. Now all I have to do is hope they sell 🙂
Anyways, just wanted to keep you all up to date on my progress and I will be writing more about this in a later post once my products arrive at Amazon and starts selling.
Until then, thank you all for reading!
One last thing, please leave a comment below if you know of any other places or resources to get product images taken. Thanks!
Comments
17 Comments
My niece referred me to your website. I am mid 50s & on a sabbatical from my job. I’m looking to find a side hustle. I find it inspiring that you are willing to share all of this information. You are so young and inspiring! I am certain you will succeed. If at first you fall, get up & try again. I am betting that many of us will purchase your product as a way to say thank you for sharing your knowledge.
GOOD LUCK! Rose
Hi Rose!
Thank you for commenting and tell your niece I say thanks for referring you. Glad to have you here.
One question, what product are you talking about? I am not selling any product?
Josh
I think she means your amazon product.
Oh, okay! I guess that makes sense but I am not disclosing my product to the public. But thanks for clearing that up John
Josh
Josh,
Great job here again, thanks for all the excellent info. I’ve been following for a while now and I’m enjoying your journey. Best of luck with your launch! I hope I’ll join you soon on Amazon!
Thanks
Ted
Hi Ted,
Thank you! Glad you are enjoying my content and best of luck on your own journey on Amazon.
Josh
actually you send photgrapher to amazon warehouse to click pics?For some one who is not in USA and sending products to Amazon warehouse how does this photos stuff work?
Great post Josh,
Apart from Amazon, high quality pictures will always get you the sale 55% of the time and that is why its always good to ensure that you use good looking pictures in your products listing.
Thanks a lot for this definitive guide, really interesting.
Hi Theodore,
You’re absolutely right! Thanks for leaving a comment, see ya around
Josh
How fantastic!
I was on your website looking at the tips and nodding my head and I see that you mentioned my Elance account 🙂
Talk about fate – I was picking up tips for my wife, who will soon be selling on Amazon. Our studio works with nearly a dozen Amazon sellers every month (while Amazon sellers are only a small fraction of our studio’s client base, they’re often the most fun projects to work on) and I think it’s fascinating.
I hope you don’t mind me poking my head in and adding a couple of additional tips that might help prevent a couple of snafus we’ve seen arise over the years.
Let me start off by saying that there is a huge benefit to hiring a professional photographer. I know I’m extremely biased here, but I’m one of those people that will occasionally check on how my clients are doing after a project is complete. Often I’ve seen a good project turn into a best seller (or #1 new product) and it later becomes a selling point for me to point this out to a prospective client, so we definitely care about taking the best images for you.
You can take a product shot in front of a window and hire someone to knock out the background, but that photo will almost always convert better if it’s shot by a professional studio the first time around.
I’ve even heard of sales skyrocketing when we’ve re-shot products that other talented professionals have taken.
1) Find a studio that specializes in Amazon product photography. You may have had the best wedding photographer in the world, but if he or she is shooting products in a light cube, or in front of a window, you may not be getting the best value.
Photographer portfolio is everything. A jump of 10% in image quality might lead to 20% more sales, which offsets the amount that you paid for your photographer.
There’ve been times where we’ve been asked to reshoot photos take by a different studio that I thought were just fine, only to see sales go way up with the new images.
2) Have a good, clear explanation of your product and how you’d like it shot. We receive several requests each week that say something like “need pricing for product photos” or “have kitchen products I need shot”. Many photographers (us included) have a pricing page, but this only covers standard product shots on white. Getting an accurate quotation and building up a strong working relationship with your photographer is about removing as much guesswork as possible and minimizing the back and forth communication. Both yourself and your photographer have other things to do and if we can cut the amount of pre-booking emails from 20 down to 3 or 4, that puts a smile on everyone’s face!
3) Be ready to book. This is more of a personal thing for me, but it does help build that relationship with your photographer if they go through the process of hashing out a quote, creative direction, shot list and a contract and then receive that signed contract back within 48 hours.
4) Always sign the contract before shipping your product. While this may seem obvious, we still receive several products each week from Amazon sellers folks who have not booked us to shoot their products.
5) Inspect your product before shipping. This one is highly recommended. It’s certainly easier to drop ship from Amazon, but it’s important that the samples you ship to your photographers are the best representation of your product. Remove any tags, labels, ensure the product works and visually inspect it for flaws or damage)
6) If you have branded packaging, send ‘flat’ versions of just the packaging, in addition to your packaged product. Packaging arrives damaged or wrinkled or creased/dirty/scratched/flawed about 60% of the time. In a purchasing situation, this doesn’t matter, as we’re just going to tear it open to get at our goodies, But for product photography, I definitely recommend sending out additional packaging so that we can repackage it if necessary. Or, if you have a shiny cellophane package, we can photograph it flat and ‘overlay’ the non wrinkled flat shot over another image.
Getting a quotation – here’s what a photographer needs in order to prepare a good quotation:
– Good description of your product. Chances are, I may have photographed something similar and can respond with some great ideas of my own. If I haven’t shot your product before, I do extensive and considerable research and offer suggestions based on my research. My goal as a studio owner isn’t just to make a buck, it’s to ensure your images convert well and look better than anything currently on Amazon. It’s a huge selling point for my studio is we can say “this product went on to become a best seller for xxxx number of weeks”.
– Number of shots on white
– If you know the angles you want, definitely include them
– Number of lifestyle shots and possibly a description of what you need. Every product and every seller is unique. Sometimes I know right away how I’d want to shoot a product and sometimes I need a little information from my client. All of the above is the bulk of what’s referred to as ‘creative direction’. This ensures that the photos we take fits your expectation and vision.
Without good creative direction, the photographers’ best judgment is used, which is great 95% of the time, but if you’re not happy with the photos, there’s usually not an option for a free reshoot!
Lifestyle (action) shots:
Lifestyle photography DOES convert extremely well for many products and not so well for others. It breaks up the monotony of white background shots, but I always try to advocate for my clients and make recommendations to clients that are on the fence about whether I feel an action shot is even necessary.
Lifestyle photography is billed at a different rate than product shots on white. Some studios have flat fees, some have hourly fees based on a day rate.
The reason for these extra fees is that we’re often spending hours creating a ‘set’, or going on location or something an additional hours styling props and products, or casting for a model.
A big benefit with our studio is that we have interns/assistants, a full time makeup artist and stylist at our studio that can build and style a set and touch up a model’s makeup, so it’s easier to prepare a quote, as all of that is handled in house.
There’s also miscellaneous costs with lifestyle photography that we work into a quote.
– modeling fees (most jobs are really small and we’re often able to save a lot of money by hiring the model directly rather than through an agency). This is a minimum fee of $100 and while that seems like a lot, this is for a professional model/actor with experience and great camera presence. That cost breaks down to $10 for model’s parking (our studio is in downtown Los Angeles), $25 for a basic manicure or pedicure (this is important for almost every job and if we’re talking about a male model, we can replace mani/pedi with a good clean barber shave/haircut), which leaves $65 profit for the model.
Because he or she may be coming all the way from the valley, if we pay them any less, they might not show up and we lose time+money from having to reschedule the shoot, rebuild the set, lighting, etc.
– permits (for L.A. beach, city or outdoor shots)
– makeup artistry (although our makeup artist is in house, it’s still a service that we have to charge for when there’s a model)
I tend to ramble and get extremely long winded, so I’ll leave off here for now. I cannot tell you enough how big my smile was seeing my name mentioned on such a great article.
I won’t spam my studio name or website here, or include any photo sample though, as I’d hate to turn this into an advertisement, but hopefully we have the pleasure of working with a few of your readers!
Sincerely,
Deacon Tyler
No way haha small world! I am glad you agree with the stuff I said and thank you for giving some of your own advice, I really appreciate it! Thank you for commenting 🙂
Josh
oh and also, I have mostly left the Elance/Upwork platforms, but would like to invite interested parties to view my work and hire my studio at http://fsequence.photography !
Josh, all this info has been awesome, inspiring, and empowering. Thanks. I have a question about product pictures. If I will be selling something in 9 different colors, do I need to take a pic of the product in each color? If so, would that eat up my 8 pic limit?
Hi Tim,
Good questions! I think you would need a picture for each color but you would use it as the main picture for each variation. So that would mean that it wouldn’t take up your 8 pic limit. I do not know this for sure but I think that is how it works
Josh
Hey Josh,
Loved the post, good stuff. How’s it all going?
James
Hey James,
Thanks 🙂
It is going very well so far! You can check out my most recent update here if you want – https://www.passionintopaychecks.com/increased-rankings-and-sales-ordered-a-new-shipment-update-15/
Josh
Sizing charts as a photo are an Amazon no-no.
Leave a Comment